Activate, Upgrade Using USB connection
These instructions apply to applicable Non-Windows® based Snap-on diagnostic tools with a microSD card and USB connection.
As this instruction sheet is intended for multiple markets, these instructions may apply to other diagnostic tools not listed in the example. All images and illustrations used in this document are intended as examples, and are for reference only.
Estimated Times
Upgrade: 25-60 minutes
Activation: 2 minutes
**North America (NA) and Australia (AU) ONLY** To assist with these procedures, make sure to perform a ScanBay Truck Stock upgrade at the time of new software releases, for unsold truck stock.
Before You Begin
To perform these procedures, you will need:
| ● | To power the diagnostic tool using its AC power supply. |
| ● | The USB cable supplied with the diagnostic tool. |
| ● | Your authorized Snap-on Chrome sales system laptop with ScanBay. |
The diagnostic tool must be powered by the AC power supply during these procedures. Damage can occur to the diagnostic tool if accidental power loss, or the power is turned off, or power supply is disconnected during these procedures.
Diagnostic Software - Activation and Upgrade
Use the following instructions to activate and upgrade diagnostic software using ScanBay.
| 1. | On your PC, open an invoice for your customer and select ScanBay. |
The Select Programming Media dialog box displays.
| 2. | Select “All Other Diagnostic Families/Products”, then select Next. |
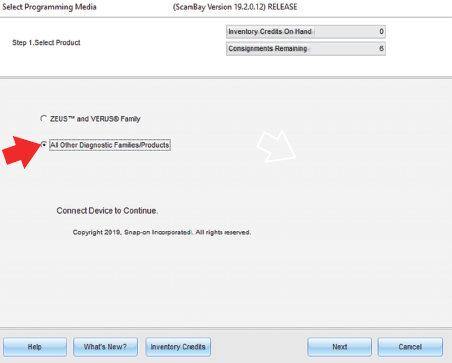
The Connection Information screen displays
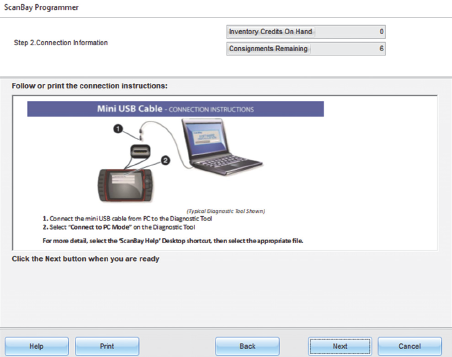
| 3. | Connect the AC power supply to the diagnostic tool, and turn on the diagnostic tool. |
| 4. | Connect the USB cable to the mini USB jack on top of the diagnostic tool and to your PC. |
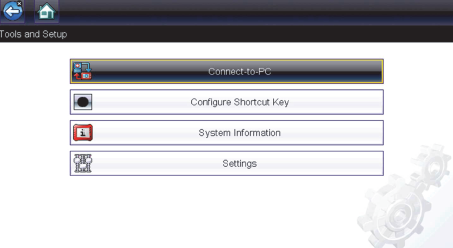
| 5. | From the Home screen, select Tools > Connectto- PC. |
| 6. | On your PC, continue to follow the onscreen instructions until the “Select Qualifying Software” screen displays. |
| 7. | Select the desired software upgrade from the list, then select Next. |
| 8. | Follow the onscreen instructions to begin programming. |
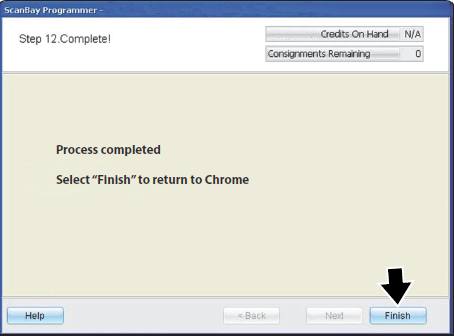
| 9. | After programming has completed, select Finish. |
| 10. | Exit ScanBay. |
| 11. | Disconnect the USB cable. |
| 12. | To complete the installation, select Exit (to close Connect-to-PC mode) on the diagnostic tool. |
The installation process automatically starts when you select Exit to close Connect-to-PC mode. Once the installation process is complete the Home screen displays and the diagnostic tool is ready for use.


